Escape HTML in WordPress

This sounds a little silly, but even as a developer I briefly got confused while trying to render (or rather, not render) HTML in WordPress.

I typically dump code into WordPress using their markdown syntax, which works great for almost everything.  But if you need to actually put HTML in a code block, that fails because it will literally get rendered into the page!

The solution is easy though.  Just google “HTML Entity Encoder” or something similar and you’ll get to a site like this https://mothereff.in/html-entities where you can enter your HTML and have it encoded so that it will display properly.

In case that doesn’t make sense to you, let’s use a div opening tag as an example.  It would change to &lt;div&gt; where the “lt” is less-than, or “<“, and the “rt” is greater-than, or “>”.  Since it’s encoded, it will be displayed properly, but the div tag will not be interpreted part of the page.


Jupyter Auto-Run Cells on Load

Why Do We Need This?

If you are making a Jupyter notebook that heavily uses widgets and conceals the code used to make them, you’ll quickly run into an issue. Another person coming to this notebook would basically just see this message for all of your widgets:

“A Jupyter widget could not be displayed because the widget state could not be found. This could happen if the kernel storing the widget is no longer available, or if the widget state was not saved in the notebook. You may be able to create the widget by running the appropriate cells.”.

You can simulate this for yourself by pressing the “restart the kernel (with dialog)” button and then force refreshing your browser (ctrl + shift + r in chrome).

How Do We Do It?

I came across this stack-overflow post which gives a good solution (especially if you are already hiding code in other areas to make it look neater, like I noted in this blog).

Just paste this in its own cell at the top of your notebook:

%%html
<script>
    // AUTORUN ALL CELLS ON NOTEBOOK-LOAD!
    require(
        ['base/js/namespace', 'jquery'], 
        function(jupyter, $) {
            $(jupyter.events).on("kernel_ready.Kernel", function () {
                console.log("Auto-running all cells-below...");
                jupyter.actions.call('jupyter-notebook:run-all-cells-below');
                jupyter.actions.call('jupyter-notebook:save-notebook');
            });
        }
    );
</script>

 
Then all your cells will run on load and all of your widgets will show up nice and neat the first time around.

Read-only / Protected Jupyter Notebooks

Jupyter notebooks are fantastic, but they’re really geared at developers.  I had to lock one down so it could be used by non-developers (without damaging it).  It took quite a lot of googling!

I figure that a lot of people must need this.  If I were a university instructor, I’d like to send students to a server, let them play, but prevent them from breaking my example.

Locking Things Down

Here are the different things I did to mitigate damage:

  1. You can actually make the entire notebook read-only by setting the file permissions on command line or in properties (works for Windows and Linux).  Jupyter will detect this (after you reload the page) and show that you can’t save anything.
  2. You can make individual cells un-deletable and un-editable (so they don’t mess up the top cells that the lower down cells they’re working with depend on):
    • Run a cell.
    • Click “Edit Metadata” in its banner.
    • Add:
      • “deletable”: false,
      • “edittable”: false,
  3. You can actually hide the code for a range of cells like this code which hides the first four (which is very useful if you’re using iPython UI widgets and just want to show widgets and now how they were made) – disclaimer – I got this off stack overflow but am having trouble finding it to reference it currently:
from IPython.display import HTML
HTML('''

    code_show=true;
    function code_toggle_and_hide_move_buttons() {
        if (code_show){
            $('div.input').slice(0,4).hide();
            $('#move_up_down').hide()
        }
        else {
            $('div.input').slice(0,4).show();
            $('#move_up_down').show()
        }
        code_show = !code_show
    }
    $(document).ready(code_toggle_and_hide_move_buttons);


''')

Further Recommendations

I would also suggest making sure you disable the terminal in your Jupyter config file and that you set a known location for your notebooks to be loaded from so that you can add the read-only attribute.

Also, you can disable various hotkeys in the UI, and you can use a CSS selector similar to the one in my “hide code” example above to hide the move-up/move-down cell buttons to help prevent errors cropping in that way.


Set Up Google Search Console (Web Master Tools) on Word Press

You can now integrate your WordPress site into Google Search Console (Web Master Tools) very easily.

Just do this:

  1. Go to Google Search Console: https://search.google.com/search-console.
  2. If you haven’t set it up yet, it will have you add a property (website) to your account.
  3. To add a property, you just provide the URL of your site (the one users end up at, not the one you use to manage WordPress in the background).
  4. After this, you will be presented with multiple options for verifying the site.  One of them will be adding a meta tag.  Click that one and get the “content” string from the tag (the part between the quotes after “conent” =.
  5. Go to your WordPress site manager (the place you change things).  On the left bar, you can find “WP Admin”.  You can also probably just go to https://<your-site-name&gt;.wordpress.com/wp-admin/ directly.
  6. Click “Tools” then scroll down to “Google Webmaster Tools”, and add the content string there.
  7. Save.
  8. Go back to Google Search Console, refresh, and you should be able to see your website verified.  This might take a little while, but it was pretty instant for me.

Note that it can take a few days for Google to scan your website and build the necessary data to fully populate the UI and make it useful.

Python PIP Install Local Module While Developing

I’m definitely still in the early stages of learning module/package building and deployment for python.  So, take this with a grain of salt…

But I ran into a case where I wanted to develop/manipulate a package locally in PyCharm while I was actively using it in another project I was developing (actually, in a Jupyter notebook).  It turns out there’s a pretty cool way to do this.

Module Preparation

The first thing I had to do was prepare the package so that it was deployable using the standard python distribution style.

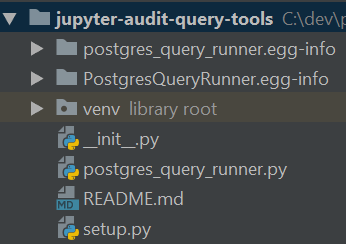
In my case, I just made a directory for my package (lower-case name, underscore separators).  Inside the directory, I created:

Here’s an example.  Ignore everything that I didn’t mention; all of that is auto-generated by PyCharm and not relevant.  In fact, it probably would have been better to create a sub-directory in this project for the package; but I just considered the top level directory the package directory for now.

package-layout

Module Installation

Once you have your module set up like this, you can jump into your command line, assuming you have PIP installed, and you can run this command (tailored for your package directory location):

λ pip install -e C:\dev\python\jupyter_audit_query_tools
Obtaining file:///C:/dev/python/jupyter_audit_query_tools
Installing collected packages: PostgresQueryRunner
Running setup.py develop for PostgresQueryRunner
Successfully installed PostgresQueryRunner

You’ll also be able to see the package mapped to that directory when you list the packages in PIP:

λ pip list | grep postgres
postgres-query-runner 1.1.0 c:\dev\python\jupyter_audit_query_tools

Module Usage

After this, you should be able to import and use the package / modules in your interpreter or notebook.  You can change the code in the package and it will update in the places you’re using it assuming you re-import the package.  So, in Jupyter, this would mean clicking the restart-kernel/re-run button.